Vue 异步更新 - nextTick
Vue 异步更新 - nextTick
Section titled “Vue 异步更新 - nextTick”下文的源码解析都是简化过的伪代码,因为实际代码需要关注的细节太多。
我们可以将和主线知识不相关的细节忽略掉,暂时只关注核心内容。
其中关于 浏览器进程 - 线程 和 事件循环 抽取出需要用到的部分大致如下:
在浏览器中,事件循环和渲染的大致顺序是:
宏任务 --> 微任务 --> 渲染 --> 宏任务 --> 微任务 --> 渲染 -->...
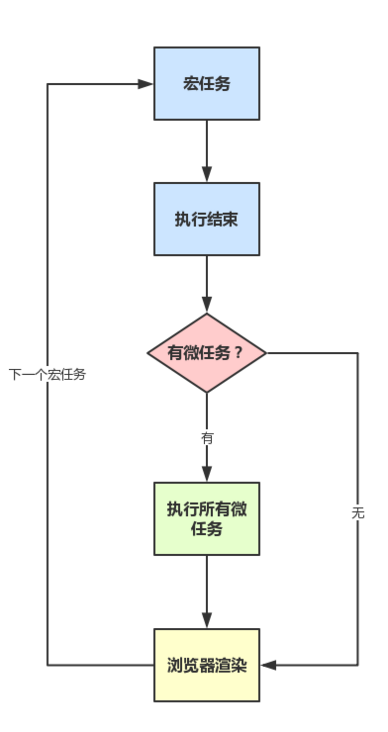
注意:有很多人都会有误解,认为不是微任务优先级更高吗,那不是最先应该执行微任务吗?
这里他们大都忽略了一个条件,那就是当前执行JS脚本本身就算的上是宏任务了。
Vue 2.x
Section titled “Vue 2.x”响应式数据变化之后发生了什么
Section titled “响应式数据变化之后发生了什么”当触发当前的数据更新时,就会触发当前数据的set,然后就会调用该响应式数据之前收集的依赖(副作用),在Vue2中,依赖(副作用)一般是Watcher实例。
接下来从源码的角度来梳理一下响应式数据变化之后的相关逻辑:
defineReactive:
源码位置:
Object.defineProperty(obj, key, { // ... // 当触发数据变化时, 会触发对应的 set set: function reactiveSetter(newVal) { // ... dep.notify(); },});Dep:
参考:dep notify 源码。
class Dep { // ... notify() { // stabilize the subscriber list first const subs = this.subs.slice(); for (let i = 0, l = subs.length; i < l; i++) { subs[i].update(); } }}这里就会发现,触发set后,watcher不会立即调用watcher.run。
而是在watcher.update中调用queueWatcher(this),将当前待触发的watcher放入到队列中进行处理延迟调用run。
接下来来看这个watcher.update到底是什么?
Watcher:
class Watcher {  constructor (    vm: Component,    expOrFn: string | Function,    cb: Function,    options?: Object  ) {    this.vm = vm
    // ...
    // options    if (options) {
      // ...
      this.lazy = !!options.lazy      this.sync = !!options.sync    }
    // ...
    this.cb = cb
    //...
    // parse expression for getter    if (typeof expOrFn === 'function') {      this.getter = expOrFn    } else {      this.getter = parsePath(expOrFn)    }    this.value = this.lazy      ? undefined      : this.get()  }
  // ...
  update() {    /* istanbul ignore else */    if (this.lazy) {      this.dirty = true;    } else if (this.sync) {      // 如果当前是同步变动, 那么就直接 run --> cb()      this.run();    } else {      // 将当前触发的 watcher 直接加入到队列中, 延迟触发, 接下来就来看看 queueWatcher      queueWatcher(this);    }  }
  run() {    if (this.active) {      // 获取新值      const value = this.get();      const oldValue = this.value;
      //...
this.value = value; // 触发绑定的 cb, 并传入新值和旧值 this.cb.call(this.vm, value, oldValue); } }}这里也许你会很好奇,为什么Watcher和视图更新有关系?接下来看Vue是如何关联上两者的。
注册响应式视图更新
Section titled “注册响应式视图更新”参考:lifecycle mountComponent 源码。
// 获取 render 生成的 VNode, 然后将 VNode 变成 DOM 元素export function mountComponent (  vm: Component,  el: ?Element,  hydrating?: boolean): Component {
  // ...
  let updateComponent = () => {    vm._update(vm._render(), hydrating)  }
  // ...
  // 注册响应式更新视图  vm._watcher = new Watcher(vm, updateComponent, noop)
  // ...
return vm}结合上文我们知道,new Watcher(vm, updateComponent, noop) 将 updateComponent 作为 getter 被传入到 watcher 中,并且 lazy 为 false, cb 为一个空函数(noop: () => ())。
其实按照常规注册响应式来说,会将 updateComponent 作为 cb 传入,这样就能在响应式数据发生变动时触发cb。
但是这里却将 updateComponent 作为 getter 传入, 具体原因请看如下解析:
-
updateComponent作为getter, 它会触发当前vm实例的data上的响应式数据的getter,这样就致使这个watcher被收集到这些响应式数据的依赖项(副作用)中。这是因为
updateComponent --> render(), 而render函数中会主动去获取渲染到视图上的值。 -
当
watcher的getter被调用时,会触发视图更新,因为当前watcher的lazy为false,因此在new Watcher()实例化的时候在构造器中就触发了this.value = this.lazy ? undefined : this.get() --> getter --> updateComponent,这里只能解释实例化的时候第一次触发updateComponent。那后续的
updateComponent该如何触发呢,这里很巧妙的就是:因为
watcher的getter的触发时机其中一个就是在响应式数据的set被触发的时候会获取最新的值这个逻辑(watcher.run() --> const value = this.get()),那就意味着updateComponent函数的调用时机就是在响应式数据的set被触发的时候。
讲完Watcher和视图更新的关联之后,接下来我们来看一看异步更新的主要入口函数 queueWatcher,我们以queueWatcher为入口,按照Vue2.5.x和Vue2.6.x的版本来分别讲述其中原理。
Vue 2.5.x
Section titled “Vue 2.5.x”参考:queueWatcher 源码。
在Vue 2.5.x中,queueWatcher,它的作用是将当前待执行的watcher加入到queue中,然后在本轮事件循环尾的微任务队列,或者下一轮事件循环开始的宏任务队列中执行flushSchedulerQueue:
function queueWatcher (watcher: Watcher) { const id = watcher.id if (has[id] == null) { has[id] = true // 如果当前的队列还没有正在 flush, 也就是还没有执行到 flushSchedulerQueue if (!flushing) { queue.push(watcher) } else { // 如果 flushSchedulerQueue 正在执行, 也就是当前的 queue: [ watcher1, watcher2... ]正在遍历执行的时候 // if already flushing, splice the watcher based on its id // if already past its id, it will be run next immediately. let i = queue.length - 1 while (i > index && queue[i].id > watcher.id) { i-- } queue.splice(i + 1, 0, watcher) } // 将 flushSchedulerQueue 这个方法丢到任务队列中延迟执行 // waiting 为 false, 说明 flushSchedulerQueue 还没有在任务队列中 // 避免重复执行 if (!waiting) { waiting = true nextTick(flushSchedulerQueue) } }}flushSchedulerQueue,它的作用就是执行队列:queue: [ watcher1, watcher2, ... ],分别调用watcher.run:
function flushSchedulerQueue() {  flushing = true;  let watcher;
  // ...
  for (index = 0; index < queue.length; index++) {    watcher = queue[index];    // ...    watcher.run();  }
// ...}参考:nextTick 源码。
nextTick(cb),它的作用就是将cb添加到本轮事件循环中的微任务队列执行,或者添加到下一轮事件循环开始的宏任务队列中开始执行:
// callbacks 里的 cb 在添加的时候被包装过: callback = () => { cb && cb.call(ctx) }const callbacks = []// 当前 flushCallbacks 是否已经在队列中且暂未执行let pending = false
// 执行 callbacksfunction flushCallbacks () {  pending = false  // 拷贝  const copies = callbacks.slice(0)  // 清空原来的 callbacks  callbacks.length = 0  // 执行 cb  for (let i = 0; i < copies.length; i++) {    copies[i]()  }}

// 在 vue 2.5.x 中, vue 对一些自定义事件 (@click="handler") 的回调 (handler) 都有包装, 用的就是 wrapperHandler = withMacroTask(handler)// 因此你会发现 vue 模板中自定义事件的回调产生的响应式数据的变动导致的 watcher 的触发, 也就是视图更新的时机是在下一轮事件循环开始的宏任务队列中// 并且如果你在 wrapperHandler 中调用的 nextTick(cb) 也是会将 cb 延迟到下一轮事件循环开始的宏任务队列中// 原因就是因为 useMacroTask = truefunction withMacroTask (fn: Function): Function {  return fn._withTask || (fn._withTask = function () {    useMacroTask = true    const res = fn.apply(null, arguments)    useMacroTask = false    return res  })}
// 将 cb 添加到 callbacks 中, 然后通过调用 flushCallback 来执行 callbacks// nextTick 中会延迟执行 flushCallbackfunction nextTick (cb?: Function, ctx?: Object) {  let _resolve  callbacks.push(() => {    if (cb) {      try {        cb.call(ctx)      } catch (e) {        handleError(e, ctx, 'nextTick')      }    } else if (_resolve) {      _resolve(ctx)    }  })  // 当前的 flushCallback 正在执行  if (!pending) {    pending = true    // useMacroTask 什么情况为 true 呢, 调用被 withMacroTask 包装过的方法, useMacroTask 为 true    if (useMacroTask) {      // 将 flushCallback 放到下一轮事件循环开始的宏任务队列中执行      macroTimerFunc()    } else {      // 将 flushCallback 放到本轮事件循环的微任务队列中执行      microTimerFunc()    }  }
if (!cb && typeof Promise !== 'undefined') { return new Promise(resolve => { _resolve = resolve }) }}macroTimerFunc将flushCallback推入宏任务队列中执行:
let macroTimerFunc;// 采用不同的兼容策略来将 flushCallback 推入宏任务队列中执行if (typeof setImmediate !== "undefined" && isNative(setImmediate)) { macroTimerFunc = () => { setImmediate(flushCallbacks); };} else if ( typeof MessageChannel !== "undefined" && (isNative(MessageChannel) || // PhantomJS MessageChannel.toString() === "[object MessageChannelConstructor]")) { const channel = new MessageChannel(); const port = channel.port2; channel.port1.onmessage = flushCallbacks; macroTimerFunc = () => { port.postMessage(1); };} else { /* istanbul ignore next */ macroTimerFunc = () => { setTimeout(flushCallbacks, 0); };}microTimerFunc将flushCallback推入微任务队列中执行,如果不兼容Promise,那么最终会降级为将flushCallbacks 推入宏任务队列中执行:
if (typeof Promise !== "undefined" && isNative(Promise)) { const p = Promise.resolve(); microTimerFunc = () => { p.then(flushCallbacks); if (isIOS) setTimeout(noop); };} else { // fallback to macro microTimerFunc = macroTimerFunc;}接下来我们结合一下实际案例来进行分析:
<body>  <div id="app">    <h1 id="h1-a">{{ a }}</h1>    <input      type="button"      value="自定义事件更改 a"      @click="handleChangeAByEvent"    />  </div>
  <script src="https://cdn.jsdelivr.net/npm/vue@2.5.3/dist/vue.js"></script>  <script>    const app = new Vue({      el: "#app",      data() {        return {          a: 1,        };      },      methods: {        handleChangeAByEvent() {          setTimeout(() => {            console.log("宏任务-01", document.getElementById("h1-a").innerText); // 2          }, 0);
          this.a++;
          // 说明数据已经变化          console.log("同步任务-01", this.a); // 2
          console.log("同步任务-02", document.getElementById("h1-a").innerText);
          Promise.resolve().then(() => {            console.log("微任务-01", document.getElementById("h1-a").innerText);          });
          this.$nextTick(() => {            console.log("next-tick", document.getElementById("h1-a").innerText);          });
          setTimeout(() => {            console.log("宏任务-02", document.getElementById("h1-a").innerText);          }, 0);
          console.log("同步任务-03", document.getElementById("h1-a").innerText);        },      },    });
/* 同步任务-01 2 同步任务-02 1 同步任务-03 1 微任务-01 1 next-tick 2 宏任务-01 2 宏任务-02 2*/ </script></body>结合上面的例子,我们可以大概猜得出来,Vue的数据变化后,视图并不会同步的发生变化,而且视图变化的时机甚至在Promise.resolve().then之后,也就是在本轮事件循环的微任务之后。
而按照JS中事件循环的大概顺序,宏任务 --> 微任务 --> 渲染 --> 宏任务 --> xxx。
我们可以大胆的猜测,视图发生变化的时机被延迟到了下一轮事件循环的开始的宏任务。
然后我们发现在nextTick(cb), setTimeout(cb, 0)中,它们都能获取到视图变化之后的结果,那么可以猜测,nextTick(cb)中cb的执行时机是不是和setTimeout相同呢,它们是不是都是宏任务呢。
$nextTick(cb) 和视图更新时机分析
Section titled “$nextTick(cb) 和视图更新时机分析”首先我们知道,根据示例的情况,是@click="handleChangeAByEvent"中的handleChangeAByEvent触发导致的视图变化,因此useMacroTask为true,而且由于浏览器Chrome不兼容setImmediate,因此flushCallbacks的调用机制为:
const channel = new MessageChannel();const port = channel.port2;channel.port1.onmessage = flushCallbacks; // 视图更新macroTimerFunc = () => { port.postMessage(1);};postMessage是宏任务,因此除了第一个setTimeout的执行不符合预期外,其他的都符合预期。
第一个setTimeout(cb, 0)应该是在this.a ++ 之前就执行了,那么理论上宏任务队列为:
[ cb, postMessage(1) ],但是实际执行结果却是先执行的postMessage(1) --> flushCallbacks,也就是先执行的视图更新,再执行的 cb。
这里的原因是 setTimeout(cb, timeout) 中的计时是有误差的,cb进入宏任务队列的时间一般会比timeout要晚几毫秒。
也就因此postMessage(1) --> onmessage --> flushCallbacks先一步进入了宏任务队列中了。
<body>  <script>    setTimeout(() => {      console.log("timeout, 0");    }, 0);
    const channel = new MessageChannel();    const port = channel.port2;    channel.port1.onmessage = () => {      console.log("postMessage");    };    port.postMessage("any params");
    // 输出结果:    // postMessage    // timeout, 0  </script></body>
响应式数据变化到视图更新流程
Section titled “响应式数据变化到视图更新流程”因此当一个数据发生变化之后,大概流程是:
this.a ++;- 触发
set; dep.notify();watcher.update();queueWatcher();nextTick(flushSchedulerQueue);flushSchedulerQueue被包装之后作为nextTick的cb,添加到callbacks中;flushCallbacks的执行时机被延迟,默认情况下是延迟到本轮事件循环中的微任务队列中执行,只有两种情况是延迟到下一轮事件循环开始的宏任务队列中;- 当
useMacroTask为true,也就是当我们@event="method"中的method被触发时,method中的响应式数据发生的变化所导致的nextTick(flushSchedulerQueue),或者直接在method里面手动调用的nextTick(cb),其中flushSchedulerQueue, cb都会被延迟到下一轮事件循环开始的宏任务队列中执行; - 不兼容
Promise时,降级方案用的是setTimeout(cb, 0);
- 当
- 遍历执行
watcher.run(); updateComponent;rerender --> patch(oldVNode, newVNode);- 更新
DOM;
Vue 2.6.x
Section titled “Vue 2.6.x”在Vue 2.6.x中,前面的部分都和Vue.2.5.x中类似,区别部分是在文件next-tick.js中。
参考:nextTick 源码。
nextTick(cb),它的作用就是将cb添加到本轮事件循环中的微任务队列执行,或者添加到下一轮事件循环开始的宏任务队列中开始执行,但是和2.5.x不同的是,2.6.x默认就是将cb推入微任务队列执行,只有不兼容微任务相关API时,才会最终降级为宏任务:
// callbacks 里的 cb 在添加的时候被包装过: callback = () => { cb && cb.call(ctx) }const callbacks = []
// 执行 callbacksfunction flushCallbacks () {  pending = false  // 拷贝  const copies = callbacks.slice(0)  // 清空原来的 callbacks  callbacks.length = 0  // 执行 cb  for (let i = 0; i < copies.length; i++) {    copies[i]()  }}

// 在 vue 2.6.x 中移除了 withMacroTask, 也就是移除了 useMacroTask// 不会再有特殊的自定义事件的处理

// 将 cb 添加到 callbacks 中, 然后通过调用 flushCallback 来执行 callbacks// nextTick 中会延迟执行 flushCallbackfunction nextTick (cb?: Function, ctx?: Object) { let _resolve callbacks.push(() => { if (cb) { try { cb.call(ctx) } catch (e) { handleError(e, ctx, 'nextTick') } } else if (_resolve) { _resolve(ctx) } }) // 没有了 useMacroTask 的判断, 直接调用 timerFunc if (!pending) { pending = true timerFunc() } // $flow-disable-line if (!cb && typeof Promise !== 'undefined') { return new Promise(resolve => { _resolve = resolve }) }}timerFunc默认情况下将flushCallback推入微任务队列中执行,如果不兼容Promise, MutationObserver等微任务相关API时,才最终会降级为将flushCallbacks 推入宏任务队列中执行:
let timerFunc;
if (typeof Promise !== "undefined" && isNative(Promise)) {  const p = Promise.resolve();  timerFunc = () => {    p.then(flushCallbacks);    if (isIOS) setTimeout(noop);  };  isUsingMicroTask = true;} else if (  !isIE &&  typeof MutationObserver !== "undefined" &&  (isNative(MutationObserver) ||    // PhantomJS and iOS 7.x    MutationObserver.toString() === "[object MutationObserverConstructor]")) {  let counter = 1;  const observer = new MutationObserver(flushCallbacks);  const textNode = document.createTextNode(String(counter));  observer.observe(textNode, {    characterData: true,  });  timerFunc = () => {    counter = (counter + 1) % 2;    textNode.data = String(counter);  };  isUsingMicroTask = true;} else if (typeof setImmediate !== "undefined" && isNative(setImmediate)) {  timerFunc = () => {    setImmediate(flushCallbacks);  };} else {  // Fallback to setTimeout.  timerFunc = () => {    setTimeout(flushCallbacks, 0);  };}
对比 2.5.x 改动
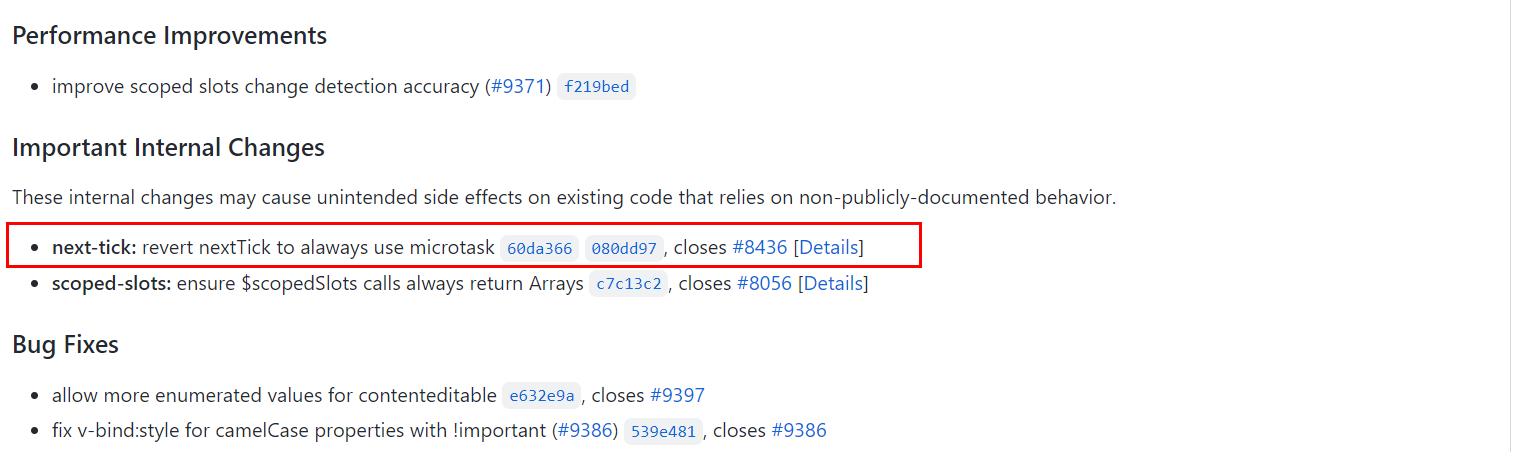
Section titled “对比 2.5.x 改动”Vue 2.6.0 对 $nextTick 做了修改,将其全部改为微任务实现,只有实现微任务的API全部不兼容时,才会采用宏任务做兼容。
https://github.com/vuejs/vue/releases/tag/v2.6.0
接下来我们结合一下实际案例来进行分析:
<body>  <div id="app">    <h1 id="h1-a">{{ a }}</h1>    <input      type="button"      value="自定义事件更改 a"      @click="handleChangeAByEvent"    />  </div>
  <script src="https://cdn.jsdelivr.net/npm/vue@2.6.1/dist/vue.js"></script>  <script>    const app = new Vue({      el: "#app",      data() {        return {          a: 1,        };      },      methods: {        handleChangeAByEvent() {          setTimeout(() => {            console.log("宏任务-01", document.getElementById("h1-a").innerText); // 2          }, 0);
          this.a++;
          // 说明数据已经变化          console.log("同步任务-01", this.a); // 2
          console.log("同步任务-02", document.getElementById("h1-a").innerText);
          Promise.resolve().then(() => {            console.log("微任务-01", document.getElementById("h1-a").innerText);          });
          this.$nextTick(() => {            console.log("next-tick", document.getElementById("h1-a").innerText);          });
          setTimeout(() => {            console.log("宏任务-02", document.getElementById("h1-a").innerText);          }, 0);
          console.log("同步任务-03", document.getElementById("h1-a").innerText);        },      },    });
/* 同步任务-01 2 同步任务-02 1 同步任务-03 1 next-tick 2 微任务-01 2 宏任务-01 2 宏任务-02 2*/ </script></body>同步任务没有获取到最新的视图,说明视图的更新依旧是异步的,但是由于微任务和宏任务都获取到了最新的视图,所以我们也无法推测视图更新是在本轮事件循环的微任务队列中还是下一轮事件循环开始的宏任务队列中。
然后$nextTick(cb)和Promise.resolve().then(cb)中的cb都获取到了最新的视图,并且$nextTick(cb)中的 cb 在Promise.resolve().then(cb)中的 cb 之前执行,这里说明$nextTick(cb)是将cb延迟到本轮事件循环的微任务队列中执行。
$nextTick(cb) 和视图更新时机分析
Section titled “$nextTick(cb) 和视图更新时机分析”首先我们知道,根据示例的情况,而且由于浏览器Chrome兼容Promise,因此flushCallbacks的调用机制为:
Promise.resolve().then(flushCallbacks);看下面的例子,你是否会好奇,为什么$nextTick(xx)中 xx 的执行时机比他前面的Promise.resolve().then(xx)中的 xx 要早?
这是因为this.$nextTick(cb)是将cb加入到callbacks中,然后在flushCallbacks中执行,而flushCallbacks是在this.a ++的时候就被推入了微任务队列,也就是说flushCallbacks比Promise.resolve().then(xx)中的xx更早进入微任务队列。
当前微任务队列:[ flushCallbacks, xx ]:
this.a++;
Promise.resolve().then(() => {  console.log("微任务-01", document.getElementById("h1-a").innerText);});
this.$nextTick(() => {  console.log("next-tick", document.getElementById("h1-a").innerText);});
响应式数据变化到视图更新流程
Section titled “响应式数据变化到视图更新流程”大部分和2.5.x相同,只有第8步不同,大概流程是:
this.a ++;- 触发
set; dep.notify();watcher.update();queueWatcher();nextTick(flushSchedulerQueue);flushSchedulerQueue被包装之后作为nextTick的cb,添加到callbacks中;flushCallbacks的执行时机被延迟,默认情况下是延迟到本轮事件循环中的微任务队列中执行,只有一种情况是延迟到下一轮事件循环开始的宏任务队列中;- 不兼容
Promise, MutationObserver时,才最终降级为宏任务;
- 不兼容
- 遍历执行
watcher.run(); updateComponent;rerender --> patch(oldVNode, newVNode);- 更新
DOM;
Vue 3.x
Section titled “Vue 3.x”当前选择版本
3.2.x
响应式数据变化之后发生了什么
Section titled “响应式数据变化之后发生了什么”当触发当前的数据更新时,就会触发当前数据的set,然后就会调用该响应式数据之前收集的依赖(副作用),在Vue3中,依赖(副作用)一般是ReactiveEffect实例。
接下来从源码的角度来梳理一下响应式数据变化之后的相关逻辑:
reactive:
参考:reactive 源码。
// 将目标对象转化为 proxy 对象function reactive(target: object) {  // ...  return createReactiveObject(    target,    false,    mutableHandlers,    mutableCollectionHandlers,    reactiveMap,  );}
function createReactiveObject( target: Target, isReadonly: boolean, baseHandlers: ProxyHandler<any>, collectionHandlers: ProxyHandler<any>, proxyMap: WeakMap<Target, any>,) { // ... const proxy = new Proxy( target, targetType === TargetType.COLLECTION ? collectionHandlers : baseHandlers, ); // ... return proxy;}get:
参考:createGetter 源码。
const get = createGetter();
function createGetter(isReadonly = false, shallow = false) {  return function get(target: Target, key: string | symbol, receiver: object) {    // ...    const res = Reflect.get(target, key, receiver);    // ...
    // 如果访问的不是只读对象的话(readonly(obj)), 那就进行收集副作用    if (!isReadonly) {      track(target, TrackOpTypes.GET, key);    }
    // 如果访问的值也是对象的话, 按需进行响应式转化(针对嵌套的对象进行响应式转换)    if (isObject(res)) {      return isReadonly ? readonly(res) : reactive(res);    }
return res; };}set:
参考:createSetter 源码。
const set = createSetter();
function createSetter(shallow = false) { return function set( target: object, key: string | symbol, value: unknown, receiver: object, ): boolean { let oldValue = (target as any)[key]; // ... // 触发依赖 trigger(target, TriggerOpTypes.SET, key, value); return result; };}trigger:
参考:trigger 源码。
export function trigger(  target: object,  type: TriggerOpTypes,  key?: unknown,  newValue?: unknown,  oldValue?: unknown,  oldTarget?: Map<unknown, unknown> | Set<unknown>,) {  const depsMap = targetMap.get(target);  if (!depsMap) {    // never been tracked    return;  }
  const deps = depsMap.get(key);
  if (!deps) return;  // ...
// 触发依赖 triggerEffects(deps);}triggerEffect:
参考:triggerEffect 源码。
export function triggerEffects(  dep: Dep | ReactiveEffect[],  debuggerEventExtraInfo?: DebuggerEventExtraInfo,) {  for (const effect of isArray(dep) ? dep : [...dep]) {    if (effect !== activeEffect || effect.allowRecurse) {      // ...
      if (effect.scheduler) {        effect.scheduler();      } else {        // 同步进行执行        effect.run();      }    }  }}
你会发现,触发 set 后,effect 并不一定是直接调用 effect.run。
而是如果 effect 具有 scheduler 属性作为方法, 那么就调用传入的 scheduler 方法。
这里也许你会很好奇, effect.scheduler 到底是什么?为什么 effect.scheduler 和视图更新有关系?
接下来我们就来结合源码解释一下这两个问题:
注册响应式视图更新
Section titled “注册响应式视图更新”ReactiveEffect:
export class ReactiveEffect<T = any> {  // ...
  constructor(    public fn: () => T,    public scheduler: EffectScheduler | null = null,    scope?: EffectScope | null,  ) {    recordEffectScope(this, scope);  }
  run() {    // ...
    return this.fn();  }
stop() { // ... }}setupRenderEffect:
  const setupRenderEffect = (    instance,    initialVNode,    container,    anchor,    parentSuspense,    isSVG,    optimized  ) => {    // 更新组件, 更新视图    const componentUpdateFn = () => {      // ...      if (!instance.isMounted) {        // 如果当前组件还没有被挂载, 那么进行挂载        // patch(null, nextTree) --> mount(nextTree)        patch(null, nextTree, ...)      }else {        // 如果当前组件已经挂载(也就是已经渲染到界面上了)那么直接进行 patch 即可        // ...        patch(prevTree, nextTree, ...)        // ...      }    }
    // 这里就是视图更新的原因    // 当响应式数据发生改变时会触发 () => queueJob(instance.update)    // 当组件还没有挂载时, 进行挂载    // 当组件已经挂载后, 重新 render, 然后生成 newVNode, 进行 patch(oldVNode, newVNode)    const effect = (instance.effect = new ReactiveEffect(      componentUpdateFn,      // 当响应式数据变化时会调用 effect.scheduler(): () => queueJob(instance.update)      () => queueJob(instance.update),      instance.scope // track it in component's effect scope    ))
    // 这里的 effect.run 可以理解为 componentUpdateFn    const update = (instance.update = effect.run.bind(effect) as SchedulerJob)
// ... update() }结合上文我们知道,new ReactiveEffect( componentUpdateFn, () => queueJob(instance.update), instance.scope) 将 componentUpdateFn 作为 effect.fn,并且将 () => queueJob(instance.update) 作为 effect.scheduler。
这也就解释的上面的其中一个问题,对于视图更新而言,effect.scheduler 为 () => queueJob(instance.update),那instance.update是如何和视图更新扯上关系的呢?
instance.update = effect.run.bind(effect),其中 effect.run 执行的就是 componentUpdateFn --> render --> patch。
它会触发响应式数据的 getter,这样就致使这个 effect 被收集到这些响应式数据的依赖项(副作用)中。
这是因为 componentUpdateFn --> render(), 而 render 函数中会主动去获取渲染到视图上的值。
之后视图上的响应式数据只要发生变化就会重复调用componentUpdateFn,从而触发视图更新。
讲完 ReactiveEffect 和视图更新的关联之后,接下来我们来看一看异步更新的主要入口函数 queueJob,我们以 queueJob 为入口,来讲述其中原理。
参考:queueJob 源码。
在Vue 2.x中,queueWatcher是异步更新的入口,在Vue3.x中,对应的是queueJob。
和Vue2.x不同的是,Vue3.x不用去兼容一些太低版本的浏览器,因此不用考虑兼容方案,而现在大多数浏览器都支持Promise特性了。
它的作用是将当前待执行的job加入到queue中,然后执行queueFlush:
// 将一个 job 加入到队列中export function queueJob(job: SchedulerJob) { if ( (!queue.length || // 如果当前队列中包含当前 job, 就不再添加, 默认情况 flushIndex 是当前 job 所在 queue 中的位置, 这样 includes 判断就包含了当前 job // 也就是说默认情况下, job 不允许递归调用自己 // 但是如果 job.allowRecurse === true, flushIndex 就是当前 job 所在 queue 中的位置 + 1, 即可以递归调用自己 !queue.includes( job, isFlushing && job.allowRecurse ? flushIndex + 1 : flushIndex, )) && job !== currentPreFlushParentJob ) { if (job.id == null) { queue.push(job); } else { // 升序 queue.splice(findInsertionIndex(job.id), 0, job); } queueFlush(); }}参考:queueFlush 源码。
queueFlush,它的作用就是将flushJobs方法延迟到本轮事件循环的微任务队列中执行。
// 将 flushJobs(执行队列的方法) 加入到微任务队列中// 如果 flushJobs 已经在当前队微任务列中, 那么此时 isFlushPending 就为 true, 那么 flushJobs 就不会重复执行function queueFlush() { if (!isFlushing && !isFlushPending) { isFlushPending = true; currentFlushPromise = resolvedPromise.then(flushJobs); }}参考:flushJobs 源码。
其实这里的flushJobs可以类比为Vue2.x中的flushSchedulerQueue, flushCallbacks的混合。
// 执行队列的方法function flushJobs(seen?: CountMap) {  isFlushPending = false;  isFlushing = true;  // ...
  // 在执行队列前对 queue 中的 job 按照 job.id 升序排列:  // 1. 组件更新顺序是从父组件到子组件(因为父组件总是先于子组件创建,因此父组件会有更小的 id,即更高的优先级)  // 2. 如果一个组件在其父组件的更新过程中被卸载,它的更新可以被跳过
  queue.sort((a, b) => getId(a) - getId(b));
  // ...
  // 遍历执行 job  try {    for (flushIndex = 0; flushIndex < queue.length; flushIndex++) {      const job = queue[flushIndex];      if (job && job.active !== false) {        // ...        // callWithErrorHandling(job, null, ErrorCodes.SCHEDULER)        job();      }    }  } finally {    flushIndex = 0;    queue.length = 0;
    // ...
isFlushing = false; currentFlushPromise = null; // ... }}这里我们发现,一直没有用到nextTick,我们来看一下实现:
参考:nextTick 源码。
// 通过 nextTick 将 fn 添加到微任务队列中执行// 如果当前 flushJobs 已经在微任务队列中(queueFlush), 那么添加到 flushJobs 的后面, 微任务队列: [ flushJobs, fn ]// 如果当前 flushJobs 不在微任务队列中, 那么微任务队列: [ fn ]export function nextTick(fn?: (value: any) => any): Promise<any> { const p = currentFlushPromise ?? resolvedPromise; return fn ? p.then(fn) : p;}接下来我们结合一下实际案例来进行分析:
<body>  <div id="app">    <h1 id="h1-a">{{ a }}</h1>    <input      type="button"      value="自定义事件更改 a"      @click="handleChangeAByEvent"    />  </div>
  <script src="https://unpkg.com/vue@3.2.29"></script>  <script>    const app = Vue.createApp({      data() {        return {          a: 1,        };      },      methods: {        handleChangeAByEvent() {          setTimeout(() => {            console.log("宏任务-01", document.getElementById("h1-a").innerText); // 2          }, 0);
          this.a++;
          // 说明数据已经变化          console.log("同步任务-01", this.a); // 2
          console.log("同步任务-02", document.getElementById("h1-a").innerText); // 1
          Promise.resolve().then(() => {            console.log("微任务-01", document.getElementById("h1-a").innerText); // 1          });
          this.$nextTick(() => {            console.log("next-tick", document.getElementById("h1-a").innerText); // 2          });
          Promise.resolve().then(() => {            console.log("微任务-02", document.getElementById("h1-a").innerText); // 1          });
          setTimeout(() => {            console.log("宏任务-02", document.getElementById("h1-a").innerText); // 2          }, 0);
          console.log("同步任务-03", document.getElementById("h1-a").innerText); // 1        },      },    });    app.mount("#app");
/* 同步任务-01 2 同步任务-02 1 同步任务-03 1 微任务-01 2 微任务-02 2 next-tick 2 宏任务-01 2 宏任务-02 2*/ </script></body>同步任务没有获取到最新的视图,说明视图依旧是异步的,但是由于微任务和宏任务都获取到了最新的视图,所以我们也无法推测视图更新是在本轮事件循环的微任务队列中还是下一轮事件循环的宏任务队列中。
然后$nextTick(cb)和Promise.resolve().then(cb)中的cb都获取到了最新的视图。
根据输出结果:$nextTick(cb) 中的 cb 是在 微任务-01, 微任务-02 之后输出,在宏任务-01, 宏任务-02之前输出,因此这里我们也不确定$nextTick(cb)到底是将cb延迟到下一轮事件循环开始的宏任务队列中执行,还是说延迟到本轮事件循环中微任务队列中执行。
这里的$nextTick(cb)为什么会在微任务-01, 微任务-02之后呢?
$nextTick(cb) 和视图更新时机分析
Section titled “$nextTick(cb) 和视图更新时机分析”在Vue 2.x中:
flushSchedulerQueue通过nextTick(cb)延迟到任务队列中,这里还有一些兼容方案,如果不支持微任务的相关API,最终会降级为宏任务。
在Vue 3.x 中:
flushJobs是直接用的Promise.resolve().then(cb)延迟到微任务队列中。
nextTick(cb)常规情况下利用的也是Promise.resolve().then(cb)来实现将cb扔到微任务队列中,目前的微任务队列为:[ cb ]。
但是flushJobs已经在当前微任务队列中了,那么这里的nextTick(cb)的实现会变为currentFlushPromise.then(cb)。
这里你是否会疑问,为什么我们的cb是在上一个Promise示例的then后面,却比后来的Promise.resolve().then(xx)执行更要晚(cb晚于xx执行)。
举一个例子:
Promise.resolve()  .then(() => {    console.log("微任务-01"); // 1  })  .then(() => {    // 这种连续的 then 是什么时候放进微任务队列中的    // 在上一个 then(cb) 的 cb 调用后, 下一个 then 的回调才会被推入微任务队列,    console.log("微任务-01-01");  });
Promise.resolve().then(() => {  console.log("微任务-02"); // 1});
/*  微任务-01  微任务-02
  微任务-01-01*/
再结合我们示例代码,简化出伪代码方便我们理解:
// 从上往下依次执行
// 先将 flushJobs 放到微任务队列中: [ flushJobs ]let currentFlushPromise = Promise.resolve().then(flushJobs);// 由于 flushJobs 还没执行, 那么 currentFlushPromise 的状态还处于 pending, 因此这里的 then(cb01) 不会执行currentFlushPromise.then(cb01);// 将 cb02 放到微任务队列中: [ flushJobs, cb02 ]Promise.resolve().then(cb02);
// 本轮宏任务执行结束, 开始去清空微任务队列// 先执行 flushJobs, 然后 currentFlushPromise 的状态发生改变(pending --> resolved)// 于是开始执行 then(cb01), 然后将 cb01 扔到本轮事件循环的微任务队列中, [ flushJobs, cb02, cb01 ]
也就是说目前的微任务队列为: [ flushJobs, cb02, cb01 ],然后从左往右依次执行。
这里就解释了前文中提到的,nextTick(cb)中的cb为什么会在微任务-01, 微任务-02的后面执行的问题。
当前flushJobs已经被推入微任务队列的的情况下,nextTick(cb)中的cb的执行时机会晚于本轮事件循环的其他微任务(同一层级,非链式)。
响应式数据变化到视图更新流程
Section titled “响应式数据变化到视图更新流程”因此当一个数据发生变化之后,大概流程是:
this.a ++;- 触发
set; trigger --> triggerEffects(deps),触发所有副作用(依赖);effect.scheduler();() => queueJob(instance.update) --> queue.push(job),也就是说这里的instance.update被当作job加入队列中;queueFlush(),将flushJobs方法延迟到本轮事件循环的微任务队列中执行;- 执行
flushJobs,遍历执行job(); instance.update --> effect.run.bind(effect) --> componentUpdateFn;rerender --> patch(oldVNode, newVNode);- 更新
DOM;