render, h, mount, patch
render, h, mount, patch
Section titled “render, h, mount, patch”为了更好的揭示其原理,后文的示例和实现都是简化版,这样避免我们因为各种和主要原理无关的细节而耗费精力。
接下来本文主要会讲述四点:
- 弄清楚
Vue中的VNode是什么,VDOM又是什么; - 组件选项的
render函数作用是什么,h又是什么; mount(app, '#app')是如何将VNode渲染到界面容器中;patch的目的究竟是什么,它大概是怎么个流程;
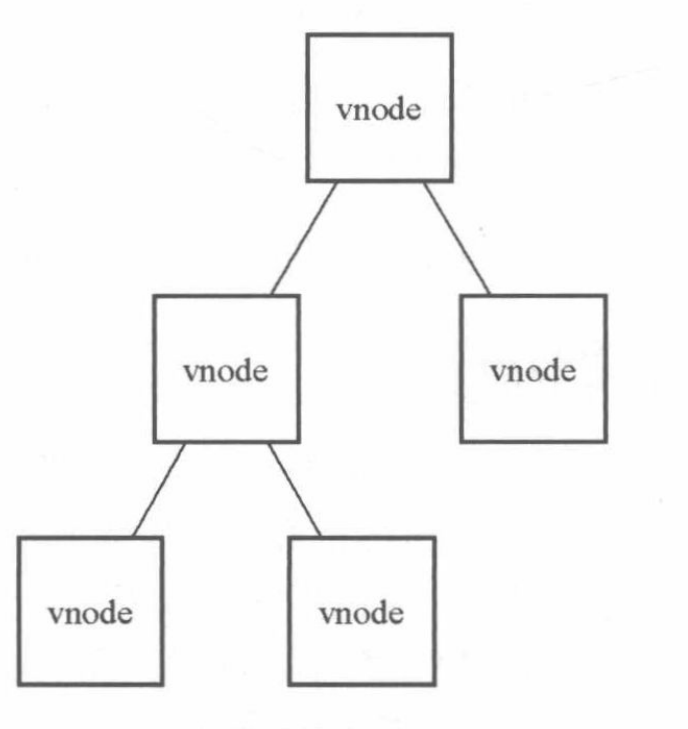
VNode 是什么
Section titled “VNode 是什么”在Vue2 ,VNode存在一个对应的类,通过它可以实例化很多不同类型的vnode实例,这些不同类型的vnode实例各自可以代表不同类型的DOM元素:
export default class VNode {  constructor(    tag,    data,    children,    text,    elm,    context,    componentOptions,    asyncFactory,  ) {    this.tag = tag;    this.data = data;    this.children = children;    this.text = text;    this.elm = elm;    this.ns = undefined;    this.context = context; // rendered in this component's scope    this.functionalContext = undefined; // real context vm for functional nodes    this.functionalOptions = undefined; // for SSR caching    this.functionalScopeId = undefined; // functioanl scope id support    this.key = data && data.key;    this.componentOptions = componentOptions;    this.componentInstance = undefined; // component instance    this.parent = undefined; // component placeholder node
    // strictly internal    this.raw = false; // contains raw HTML? (server only)    this.isStatic = false; // hoisted static node    this.isRootInsert = true; // necessary for enter transition check    this.isComment = false; // empty comment placeholder?    this.isCloned = false; // is a cloned node?    this.isOnce = false; // is a v-once node?    this.asyncFactory = asyncFactory; // async component factory function    this.asyncMeta = undefined;    this.isAsyncPlaceholder = false;  }
// DEPRECATED: alias for componentInstance for backwards compat. get child() { return this.componentInstance; }}在Vue3中,VNode是一个interface(ts中的类型的一种表示方式,可以描述一个对象的结构),它同样可以描述不同类型的vnode对象,这些vnode对象同样可以代表不同类型的DOM元素:
export interface VNode<  HostNode = RendererNode,  HostElement = RendererElement,  ExtraProps = { [key: string]: any },> {  __v_isVNode: true;  [ReactiveFlags.SKIP]: true;  type: VNodeTypes; // 节点类型  props: (VNodeProps & ExtraProps) | null; // 节点相关属性  key: string | number | symbol | null;  ref: VNodeNormalizedRef | null;
  slotScopeIds: string[] | null;  children: VNodeNormalizedChildren; // 子节点  component: ComponentInternalInstance | null; // 组件实例(如果是组件节点的话)  dirs: DirectiveBinding[] | null; // 指令  transition: TransitionHooks<HostElement> | null;
  // DOM  el: HostNode | null; // 真实的 DOM 元素  anchor: HostNode | null; // fragment anchor  target: HostElement | null; // teleport target  targetAnchor: HostNode | null; // teleport target anchor
//...}VNode本质上就是一个JS对象,它能够描述不同的DOM元素,原生DOM对象的所具备的各种属性,VNode它基本都有;
也正是因为此,VNode可以理解为一个描述页面真实DOM元素的对象,它描述了Vue该如何通过它去创建一个真实的DOM元素。
举一个最简单的例子:
const vnode = { // 说明该节点是元素节点(它具有标签) --> createElement(创建方式) tag: 'div' // 元素节点一般有子节点, 它的子节点同样是 vnode children: [ { // 如果只有 text, 那么说明这个节点是文本节点, --> createTextNode(创建方式) text: 'xxx' }, childVnode2 //... ]}VDom 是什么
Section titled “VDom 是什么”由VNode组成的Tree就可以看作VDom,这里其实可以类比为Dom Tree,VDom 和 Dom是存在对应关系的。
VNode 是的常见作用是什么
Section titled “VNode 是的常见作用是什么”Vue中在首次渲染视图时,会调用render生成第一个VNode(此时页面中没有任何节点),是直接将VNode对应的Dom元素插入到界面上。
当在下一次渲染时,会重新调用render得到生成一个新的VNode,也就是newVNode,那么上一次调用render函数得到的VNode就是oldVNode(oldVNode对应当前页面上的DOM元素),然后调用patch(oldVNode, newVNode)比较两者的不同,得到最小操作代价来更新界面,使得界面上的元素能够和newVNode的对应的Dom结构相同。
我们知道,Vue是通过将VNode渲染成真实的DOM元素,然后插入到容器中。
这里正是因为VNode这一个抽象层的存在,将Vue和真实的DOM元素实现了解耦,也就是说,实现了和平台相关的DOM API实现了解耦。
在Vue中它是通过nodeOps来描述的渲染API,也就是说,其他平台只要结合自身平台实现nodeOps即可,这样就实现了跨平台的效果。
render,h,mount 的概念和简单实现
Section titled “render,h,mount 的概念和简单实现”一个Vue组件如何变为页面上的DOM元素,大概流程:
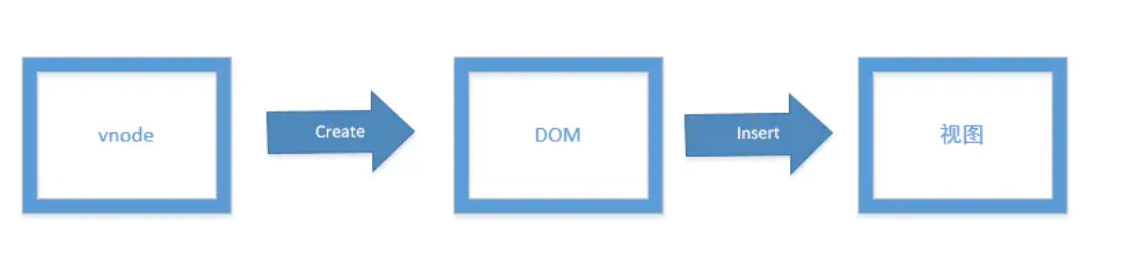
其中VNode是通过render中的h得到的,而VNode到视图又是通过mount实现的。
render,h 代码实现
Section titled “render,h 代码实现”首先我们知道,render函数会返回调用h --> hyperScript得到的VNode,因此代码如下:
function render() {  return h();}
// 得到 VNode, 这里我们简单模拟实现一个, VNode 的核心就是描述 DOM 元素function h(tag, props, children) {  return {    // Dom 标签(div, span, h1...)    tag,    // Dom 属性(class: xxx, style: xxx, onClick: xxx...)    props,    // 子节点(Vnode)    children,  };}
mount 代码实现
Section titled “mount 代码实现”mount的作用是将VNode解析为真实的Dom结构然后插入到指定容器中,代码如下:
// 将 VNode 转换成 Dom, 然后插入到 container 下function mount(vnode, container) {  const tag = vnode.tag;  const el = document.createElement(tag);  // 将真实 dom 元素放在 vnode 上  vnode.el = el;  const events = (vnode.events = new Map());
  // 设置属性, 监听器, ...  const props = vnode.props;  if (props) {    Object.keys(props).forEach((key) => {      const val = props[key];      // 针对事件的处理      if (key.startsWith("on")) {        const eventName = key.slice(2).toLowerCase();
        // 把事件缓存到 vnode 上, 方便后期我们 patch 时进行比较(因为对于函数来说, 如果不能缓存其引用, 不方便进行比较判断)        const eventCache = events.get(eventName) ?? [];        eventCache.push(val);        events.set(eventName, eventCache);
        el.addEventListener(eventName, val);      } else {        // 针对普通属性的处理        el.setAttribute(key, val);      }    });  }
  const children = vnode.children;  // 如果 children 不为 null 且不为 undefined  if (!isEmpty(children)) {    if (["number", "string"].includes(typeof children)) {      el.textContent = children.toString();    } else if (Array.isArray(children)) {      children.forEach((child) => {        // 递归插入        mount(child, el);      });    }  }  container.appendChild(el);}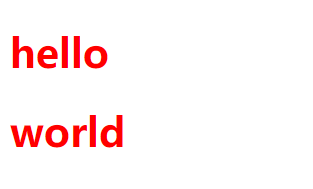
<html lang="en">  <head>    <title>Document</title>    <style>      .red {        color: red;      }    </style>  </head>  <body>    <div id="app"></div>
    <script>      // ...      function render() {        return h("div", { class: "red" }, [          h("h1", null, "hello"),          h("h1", null, "world"),        ]);      }
      const vnode = render();      mount(vnode, document.getElementById("app"));    </script>  </body></html>
patch 的概念和简单实现
Section titled “patch 的概念和简单实现”patch本身就有补丁,修补的意思。
patch(oldVNode, newVNode, container)的作用是比较两者的不同,以最小操作代价(DOM操作)在现有Dom(oldVNode.el代表当前的界面上的元素)上进行修改,最终使得界面上的Dom元素和newVNode描述的Dom相同即可。
-
如果
oldVNode和newVNode完全相同,那么直接返回; -
如果
oldVNode不存在,直接挂载newVNode即可;
-
如果
oldVNode存在, 但是newVNode不存在,那么直接将oldVNode对应的界面元素卸载掉即可; -
判断
oldVNode和newVNode的类型是否相同:-
如果不同,直接替换
oldVNode为newVNode即可;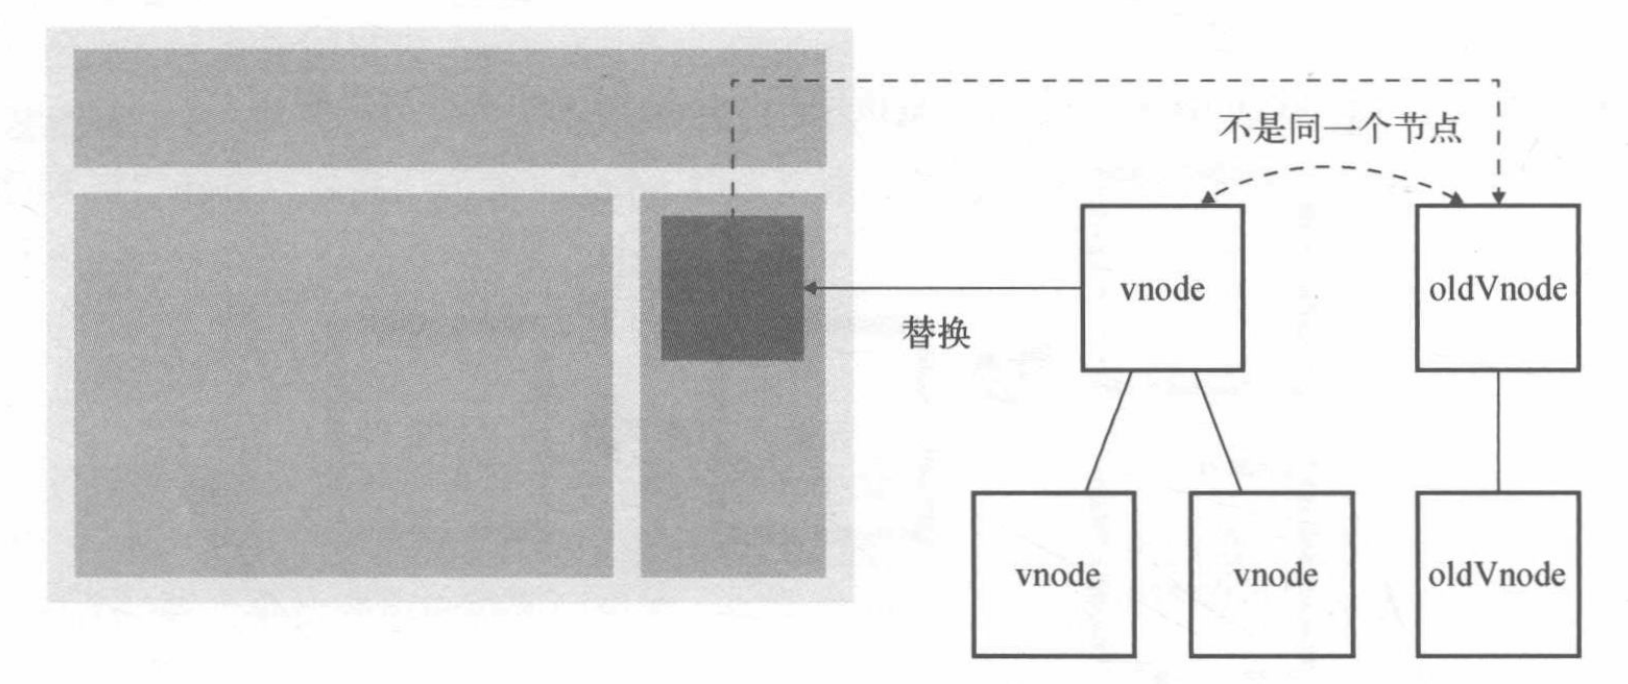
-
如果相同,则进行深层次的比较:
-
比较两者
props是否相同:newProps上有,oldProps上没有;newProps上有,oldProps上有, 但是两者不同;oldProps上有,newProps上没有;
-
比较两者子元素是否相同:
-
如果
newVNode.children的类型为字符串或者数字;-
如果
oldVNode.children的类型为字符串或者数字且不和newVNode.children相同,那么直接覆盖,el.textContent = newVNode.children;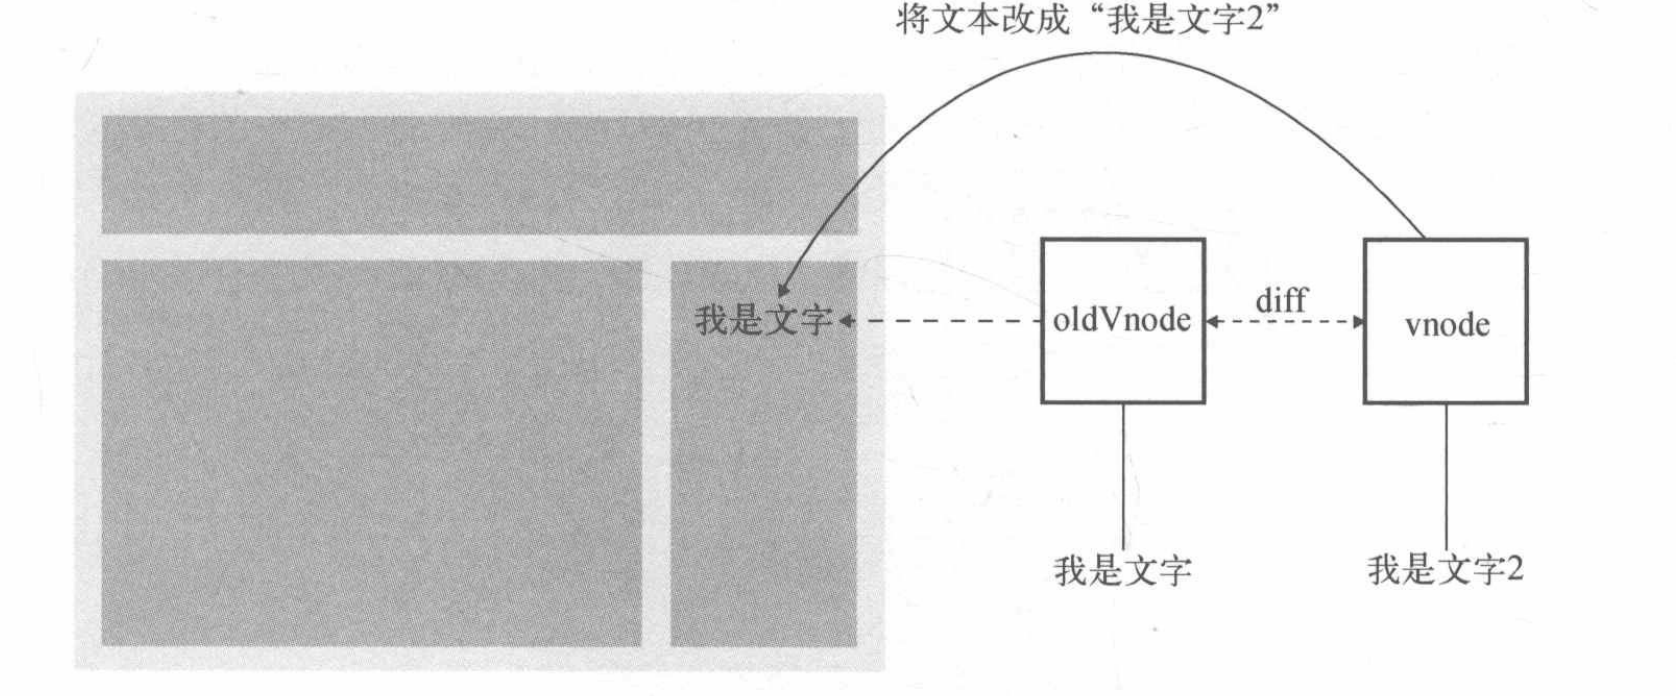
-
如果
oldVNode.children的类型不为字符串或者数字,那么先清空oldVNode.children,然后插入newVNode.children,el.innerHtml = ''; el.textContent = newVNode.children;
-
-
如果
newVNode.children的类型为数组;- 如果
oldVNode.children的类型为数字或者字符串,清空oldVNode.children文本内容,然后遍历newVNode.children执行mount操作; - 如果
oldVNode.children的类型也为数组,这里我们采用简化版diff算法:- 取
newChildren和oldChildren的公共长度的元素直接遍历进行patch; - 对于
newChildren比oldChildren多的元素进行删除; - 对于
newChildren比oldChildren少的元素进行新增;
- 取
- 如果
-
-
-
patch 代码实现
Section titled “patch 代码实现”// n1: oldVNode// n2: newVNodefunction patch(n1, n2, container) { // 如果 oldVNode 和 newVNode 完全相同, 那么直接返回 if (n1 === n2) return;
// 如果 oldVNode 不存在, 那么直接将 n2 插入到 dom 中 if (!n1) { mount(n2, container); return; }
// 如果 oldVNode 存在, 但是 newVNode 不存在, 直接移除 oldVNode if (!n2) { container.removeChild(n1.el); return; }
// 当两个节点的类型相同时(这里先我们简单的用 tag 来表示类型) if (n1.tag === n2.tag) { // 当需要进行更新操作时
// 这里我们将 oldVNode 的上挂载的真实的 DOM 元素赋值给 newVNode, 这样我们后续直接在 el 上进行操作即可 const el = (n2.el = n1.el); const events = (n2.events = n1.events);
// 比较 props
// 首先先比较 props: { class: xxx, style: xxx } const oldProps = n1.props ?? {}; const newProps = n2.props ?? {};
for (let key of Object.keys(newProps)) { const oldVal = oldProps[key]; const newVal = newProps[key]; // 1. newProps 上有, oldProps 上没有 // 2. newProps 上有, oldProps 上有, 但是两者不同
// 针对事件直接覆盖(临时做法) , 因为事件绑定的是函数, 每次都是一个新的引用 if (key.startsWith("on")) { const eventName = key.slice(2).toLowerCase(); const eventCache = events.get(eventName); // 如果 newVal 和 oldVal 不同 if (!eventCache.includes(newVal)) { // 删除掉多余的事件(oldVNode 和 newVNode 不同的) el.removeEventListener(eventName, oldVal); eventCache.splice(eventCache.indexOf(oldVal), 1); } // 增加 newVNode 上的事件 el.addEventListener(eventName, newVal); eventCache.push(newVal); } else if (newVal !== oldVal) { el.setAttribute(key, newVal); } }
for (let key of Object.keys(oldProps)) { // 1. oldProps 上有, newProps 上没有 // 那么需要去除多余的 prop if (!Reflect.has(newProps, key)) { if (key.startsWith("on")) { // oldVNode: { onEnter: xxx } newVNode { onClick: xxx } // 清除 onEnter 相关绑定事件 const eventName = key.slice(2).toLowerCase(); const eventCache = events.get(eventName);
// 清空 eventCache.forEach((cb) => el.removeEventListener(eventName, cb)); events.set(eventName, []); } else { el.removeAttribute(key); } } }
// 比较子元素
// 如果 newVNode 内容是字符串或者数字(两者渲染到界面上都是字符串) if (["number", "string"].includes(typeof n2.children)) { const n2Text = n2.children.toString(); // 如果 oldVNode 的内容也是字符串, 那么直接覆盖即可 if (["number", "string"].includes(typeof n1.children)) { const n1Text = n1.children.toString(); // 当两者内容不同时 if (n2Text !== n1Text) { el.textContent = n2Text; } } else { // 如果是其他类型, 那就需要先清空 el.innerHtml = ""; el.textContent = n2Text; } } else if (Array.isArray(n2.children)) { // 真实的 patch 做法不是这样的, 这里是简化版的 diff 过程 // 会造成很多冗余的 dom 操作(比如多余的新建元素操作等...) // 这里你不妨想想为什么会造成这些冗余操作, 是否有更好的 diff 的做法对这些 oldVNode 做到最大程度的复用以减少操作代价(Dom 操作)
// 如果 newVNode 的子元素是数组 // 那就需要比较两个数组, 来寻找不同, 然后对 dom(el) 进行操作 if (Array.isArray(n1.children)) { const oldChildren = n1.children; const newChildren = n2.children;
const oldChildrenLen = oldChildren.length; const newChildrenLen = newChildren.length;
const commonLength = Math.min(oldChildrenLen, newChildrenLen);
// 比较他们的公共长度的元素, 直接进行 patch for (let i = 0; i < commonLength; i++) { const oldChild = oldChildren[i]; const newChild = newChildren[i]; patch(oldChild, newChild, el); }
// oldChildren 比 newChildren 要多, 那么就要删除 if (oldChildrenLen > newChildrenLen) { const toBeRemovedChilds = oldChildren.slice(commonLength); toBeRemovedChilds.forEach((child) => { el.removeChild(child.el); }); } else if (oldChildrenLen < newChildrenLen) { // newChildren 比 oldChildren 要多, 那么就是需要新增的元素 const toBeAppendChilds = newChildren.slice(commonLength); toBeAppendChilds.forEach((child) => { el.appendChild(child); }); } } else if (typeof n1.children === "string") { // 清空 oldVNode 的内容 el.textContent = ""; // 然后将 newVNode 的子元素挂载到 el 上 n2.children.forEach((child) => { mount(child, el); }); } } } else { // 如果类型都不同, 那么就可以直接抛弃 oldVNode, 直接替换为 newVNode 即可 container.removeChild(n1.el); mount(n2, container); }}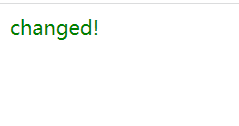
<html lang="en">  <head>    <title>Document</title>    <style>      .red {        color: red;      }    </style>  </head>  <body>    <div id="app"></div>
    <script>      // ...      const container = document.getElementById("app");      const vnode1 = h("div", { class: "red" }, [h("h1", null, "hello")]);      mount(vnode1, container);
      const vnode2 = h("div", { class: "green" }, [        h("span", null, "changed!"),      ]);      patch(vnode1, vnode2, container);    </script>  </body></html>
结合响应式最终实现示例效果
Section titled “结合响应式最终实现示例效果”接下来的实现就以这个示例为目标。
运行之后:
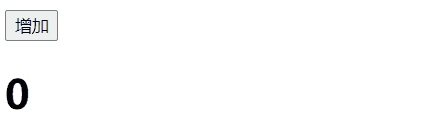
<body> <div id="app"></div> <script src="https://unpkg.com/vue@next"></script> <script> const { createApp, h } = Vue // 创建 app(应用)实例 const app = createApp({ data() { return { count: 0 } }, render() { return h('div', null, [ h( 'button', { onClick: () => { this.count++ } }, '增加' ), h('h1', null, this.count) ]) } }) // 将 vnode 挂载到 dom 元素上 app.mount('#app') </script></body>大致分解一下示例的步骤:
-
Vue组件选项中的render函数会返回调用h --> hyperScript得到的VNode; -
当在调用
app.mount时, 会触发render得到VNode,然后会直接将整个VNode变成DOM元素插入到页面容器中; -
data在内部会被转化为响应式数据,同时render也有依赖响应式数据的地方,因此会触发响应式数据的get收集依赖。当响应式数据发生改变时,会触发这些收集的依赖(也就是副作用),然后会重新触发
render,然后调用patch(oldVNode, newVNode)比较两者的不同。最终得到最小的操作代价来更新界面,使得界面上的元素能够和
newVNode的对应的Dom结构相同;
模拟实现 createApp
Section titled “模拟实现 createApp”这里我们实现的createApp 主要就是逐步完成上文中拆分的三个步骤。
响应式相关实现可以参考: 响应式实现。
createApp方法的参数是一个组件选项,它的返回值是一个对象,且具有mount方法:
function createApp(component) {  // 对 mount 进行重写  const _mount = (selector) => {    if (!selector.startsWith("#")) {      throw `${selector} is not start with '#'`;    }    const container = document.querySelector(selector);    if (!container) {      throw `can't find dom by ${selector}`;    }
    let isMounted = false;    let currentVNode, oldVNode, newVNode;    // 这里结合之前讲过的响应式    // 在 render 中是有响应式数据的, 因此这个更新函数能被收集为依赖    // 当响应式数据发生变化时, 重新触发    watchEffect(() => {      // 还没挂载时, 直接插入      if (!isMounted) {        currentVNode = component.render();        mount(currentVNode, container);        isMounted = true;      } else {        // 对于已经挂载过的节点,  当前节点变为 oldVNode,        oldVNode = currentVNode;        // 获取最新的 render(), 将其赋值为 newVNode        newVNode = component.render();        patch(oldVNode, newVNode, container);        // 当前最新的渲染结果就为 currentVNode        currentVNode = newVNode;      }    });  };
return { mount: _mount, };}可以看运行效果,最终和示例相同。
<body> <div id="app"></div> <script> const app = createApp({ // data 需要时响应式数据 data: reactive({ count: 0, }), render() { return h("div", null, [ h( "button", { onClick: () => { this.data.count++; }, }, "增加", ), h("h1", null, this.data.count), ]); }, }); app.mount("#app"); </script></body>